Computer repair

by Matthew Skelly Matthew Skelly No Comments

server reboot – Restart mobile mail and OWA


Problem:

Whenever the server reboots a process starts before the default website can start casuing mobile mail and OWA to not function.

Solution:

To restart default website in IIS right click task manager, click show processes from all users, end EdgeTransport.exe process, open “Internet Information Services (IIS)”, tree down experit-2k11sbs > sites > default website, on the right hand side where it says manage website click start, if restart and stop become highlighted, you have started the website which controls OWA and mobile mail.

by Matthew Skelly Matthew Skelly No Comments

Program syncing with Outlook 2010


Problem:

If security center service is missing or damaged, or antivirus software is not installed and current, Outlook 2010 will not allow sync with other apps without prompt.  Eg. Commit.

Solution:

You could try adding the following key to the registry:
HKEY_LOCAL_MACHINESOFTWAREMicrosoftOffice14.0OutlookSecurity

In this key add the following value:
ObjectModelGuard, DWORD =2

The values 0, 1 and 2 correspond to the options in the Programmatic Access Security settings in the Trust Center.
0 = Warn if Anti-Virus is out of date (recommended)
1 = Always warn
2 = Never warn

by Matthew Skelly Matthew Skelly No Comments

Cannot read from the source file or disk – undeletable

Problem:

File shows up in a folder, but any attempt to delete, rename or move it results in : “Error Deleting File or Folder – Cannot delete file: Cannot read from the source file or disk“.

If it’s a folder, no hidden files are inside it. You can read and write to it. No permissions error, and the file/folder is not set as hidden or read only in properties.

Dropping down to a DOS prompt and trying a DEL, DELTREE, or RN return the same error.

Solution:

This is caused by an invalid character in the file name. Possibly a dot or a space (Spaces are really hard to spot – they’re invisible. But try a rename and just use the arrow keys in the rename box. If there’s a space at the end, the arrow key will find it and move one character past the last letter). Normally Windows will not let you create something with an invalid character in the name, but it can happen if you’re in a system remotely and the connection gets cut off, or if there’s corruption on the Hard disk, or if the file was created by a Mac and then some how transferred over to the system.

I ran across a couple of possible solutions from the command prompt, but if your file has a space in the name, especially in the middle of the name, you won’t be able to run them.  Tried a couple of tools, “Killbox” returned a similar error – that the file dosen’t appear to exist. Finally came across “Unlocker”. This app will force a delete of the file. Start up the program and use it’s interface to browse to the file / folder in question (local or network drive, it doesn’t matter. as long as you can browse to it, the application can work with it), and from the actions list select “Delete”. File is immediately deleted. There’s also a “Rename” and a “Move” option. if your trying to preserve the file.

by Matthew Skelly Matthew Skelly No Comments

Rebuild Boot Configuration File Windows 7


Problem:

Post rootkit removal windows may not boot and display 7B stop error. This CLI command set can rebuild files necessary for windows 7 to boot

Solution:

>bcdedit /export C:BCD_BU
>C:
>cd boot
>attrib bcd -s -h -r
>ren C:bootbcd bcd.old
>bootrec /rebuildbcd

by Matthew Skelly Matthew Skelly No Comments

Stuck on a Pop Up!

Problem:
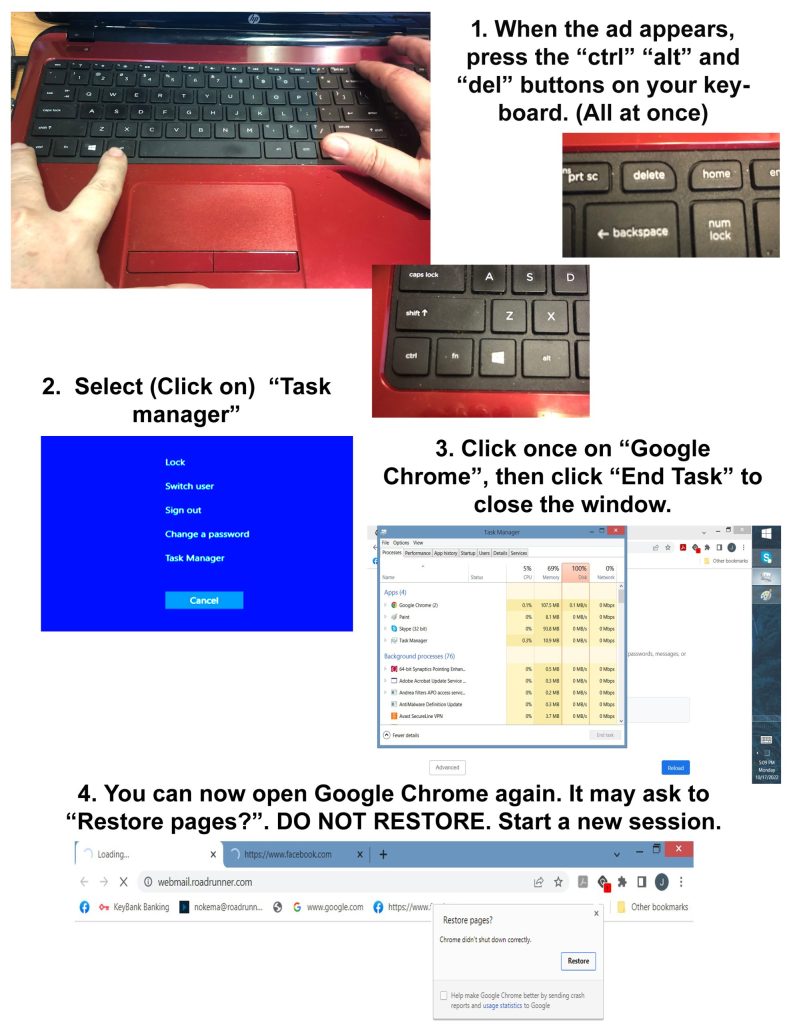
Ever have one of those terrible pop ups “YOUR COMPUTER IS INFECTED!!!!!” trap you on a page while it blares loud warnings that the FBI is coming to raid your house and steal you cat? It happens to every one of my clients sooner or later. So how do you get out of it?

Solution:

It’s a CTRL-ALT-DEL and kill the browser. But there’s a catch! Most browsers will offer to “restore session” when you bring it back up. DON’T! That’ll bring back the ad. Just start a new sessions and head back to your browsing!

by Matthew Skelly Matthew Skelly No Comments

Rebuild boot sector (complicated)


Problem:

Windows 10 not booting – blinking cursor  or can’t find installation

Solution:

Bring up the command prompt:

Boot from any DVD or USB Windows 7, 8, or 10 media.
Once you have reached the Windows Setup screen (where you select the Language, Time and Keyboard settings), press the SHIFT + F10 keys to bring up the Command Prompt.

Find out whether your disk is set to GUID Partition Table (GPT) or Master Boot Record (MBR):

In the Command Prompt, type diskpartand press Enter.
Type list disk and press Enter.
Look for your disk and see if the GPT column has an asterisk (*) – this will indicate the disk is GPT. If no asterisk is found, then the disk is set as MBR.
Type exit and press Enter.

If the type is MBR:

From the Command Prompt, type dir a: and press Enter.
If drive A: is found and a directory is displayed, check for the Windows folder in the directory. If it is there, that is the System Drive. Skip to step 2.
If the drive is not found or it doesn’t contain the Windows folder, type dir b: and press Enter. Continue through the alphabet until the drive with the Windows folder is found, but skip the X: drive. That will be the install files from the USB or DVD you are using. The most common location is the C: drive, so that example will be used in the rest of the article.
Once it is found, type:bcdboot C:Windows /S C:
In this case, C is the drive where Windows folder was found. If the Windows folder is on a different drive, use that drive letter instead of “C” in the bcdboot command above.
The message Boot files successfully created must be shown before you can continue.
Type: diskpart and press Enter.
Type: list disk and press Enter.
Type: sel disk C and press Enter.
In this case, C is the drive where Windows folder was found. If the Windows folder is on a different drive, use that drive letter instead of “C” in the sel disk command above.
Type: list vol and press Enter.
Type: sel vol C and press Enter.
In this case, C is the drive where Windows folder was found. If the Windows folder is on a different drive, use that drive letter instead of “C” in the sel disk command above.
Type: active and press Enter.
You should get a confirmation that the volume has been successfully set as active. If you don’t get the confirmation, it means that either the disk is set to GPT (not MBR), or there is a problem with the disk. Make sure you are working with the right disk.
Type: exit and press Enter.
Reboot the device – you can do this quickly from the command prompt by typing: shutdown -f -r -t 00 and press Enter.

If the type is GPT:

From the Command Prompt, type dir a: and press Enter.
If drive A: is found and a directory is displayed, check for the Windows folder in the directory. If it is there, that is the System Drive. Skip to step 2.
If the drive is not found or it doesn’t contain the Windows folder, type dir b: and press Enter. Continue through the alphabet until the drive with the Windows folder is found, but skip the X: drive. That will be the install files from the USB or DVD you are using. The most common location is the C: drive, so that example will be used in the rest of the article.
Type: diskpart and press Enter.
Type: list disk and press Enter
Type: sel disk C and press Enter.
In this case, C is the drive where Windows folder was found. If the Windows folder is on a different drive, use that drive letter instead of “C” in the sel disk command above.
Type: list part and press Enter.
Look for the partition labeled as System.
Once it is found, assign the letter R to the partition. If the letter R is already taken, you can choose any unassigned letter. To assign the letter type: assign letter=r: and press Enter.
Type: exit and press Enter.
Return to the command prompt, type the following one line at a time, pressing Enter after each line:
cd /d r:EFIMicrosoftBoot
ren BCD BCD.bak
bcdboot c:Windows /l en-us /s m: /f UEFI
Note The /l en-us part of the command sets the Windows language to English. To set a different language, replace en-us with a different language code (such as de-de for German).

by Matthew Skelly Matthew Skelly No Comments

Contact information does not appear in the address book in Outlook

Problem:

When you use your address book to select recipients for an e-mail message or a fax message in Microsoft Outlook, information from your Contacts folder does not appear in the list.

This is likely happening because the Outlook Address Book Service isn’t running, iut has either been corrupted or deleted from the accounts tab.

Solution:

Install the Outlook Address Book service
To do this, follow these steps, as appropriate for the version of Outlook that you are running.
Microsoft Outlook 2002 and Microsoft Office Outlook 2003
1.On the Tools menu, click E-mail Accounts.
2.Click to select View or change existing directories or address books, and then click Next.
3.If your Outlook Address Book is listed, click Cancel, and then go to the steps in the “How to Mark Your Contact Folder for Use with Your Address Book” section.
4.If your Outlook Address Book is not listed, click Add.
5.Click to select Additional Address Books, and then click Next.
6.Click to select Outlook Address Book, and then click Next.
7.Click OK when you receive the prompt that the address book you added will not start until you click Exit from the File menu.
8.Click Finish.
9.Click Exit from the File menu, and then restart Outlook.

Microsoft Office Outlook 2007
1.On the Tools menu, click Accout Settings .
2.Click the Adress Books tab.
3.If your Outlook Address Book is not listed, click New.
4.Select Additional Address Books, and then click Next.
5.Select Outlook Address Book, and then click Next.
6. You receive a message that states that the address book that you added will not start until you click Exit on the File menu. Click OK.
7.Click Finish.
8.Click Close, and then restart Outlook.

Microsoft Office Outlook 2010
1.On the File tab in the Ribbon, and then select the Infotab in the menu.
2.Click the Accounts Settings tab, and then click Accounts Settings again.
3.Click the Address Books tab.
4.If your Outlook Address Book is not listed, click New.
5.Select Additional Address Books, and then click Next.
6.Select Outlook Address Book, and then click Next.
7. You receive a message that states that the address book that you added will not start until you click Exit on the File menu. Click OK.
8.Click Finish.
9.Click Close, and then restart Outlook.

by Matthew Skelly Matthew Skelly No Comments

Disk space breakdown

Problem:

You want to figure out which folders are using the most space, ex: Windows is using 14 GB, Program files is using 20Gb, My documents has 10GB

Solution:

There’s no trick to this one, I’m actually just going to recommend an app! The app is WinDirStat. This is a little freeware marvel that I use on a regular basis. You may remember a previous article about Acronis creating temp files that blow up your HDD, well the way I find those files is by using WinDirStat. It breaks down drive usage by folder and file type and can help you see what’s clogging up your drive at a glance. Check them out over at https://windirstat.net/

Top